This blog is part of my GitHub series if you are completely new to Git & GitHub, and haven't completed the first part of this series then I would recommend you to complete the first part, understand what VCS is, why it is needed, Git Installation on the local machine, Creating GitHub account and creating your first repository and adding a file, I have covered all the basic stuff.
Connecting Git Bash to GitHub 💻🔗🌐
Previously I had created a repository in GitHub and added a Readme file to it. Now I will open the git bash terminal inside the folder where I want to store my repository locally, follow the process below :
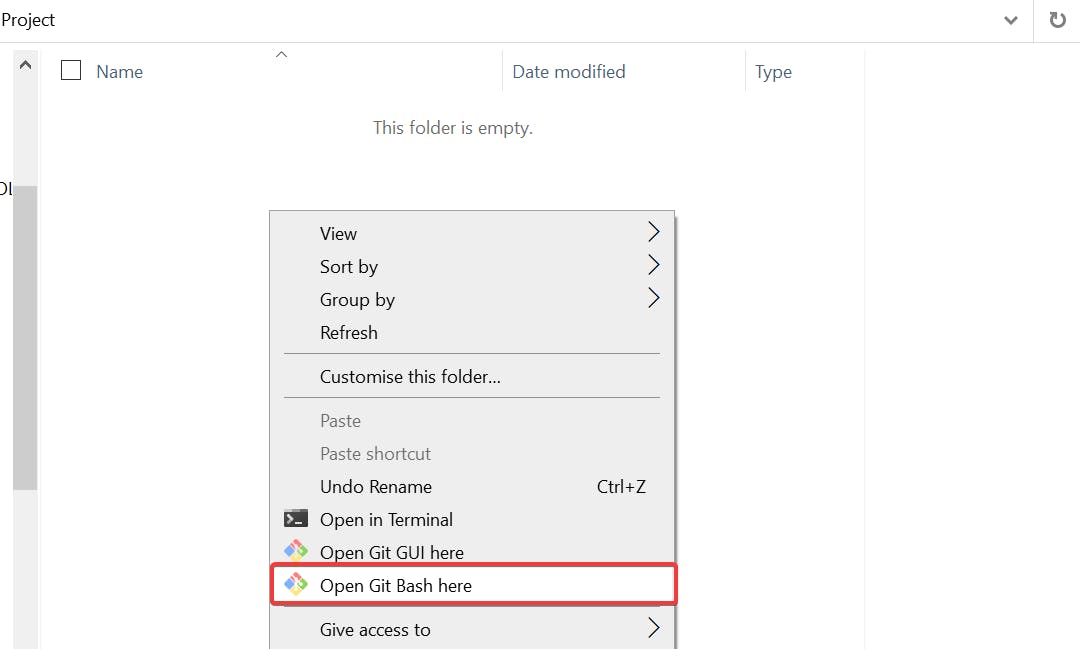
Open the folder and right-click on it
Click on "Open Git Bash here", it will open Git Bash on the same directory

Initialize a git repository
 # Creates a local git repository
 git init
Add email and username of GitHub
 # Set global Git configuration for user email
 git config --global user.email "email"

 # Set global Git configuration for username
 git config --global user.name "username"
Add your GitHub repository as a remote
    # Connects the local Git repository to a remote repository on GitHub.
    git remote add origin (Paste your repository URL here)
Verify if it's done correctly
git remote -vOutput: This should show the URLs for fetching and pushing, check the below screenshot

Add and commit changes
    # Stage all changes in the current directory and its subdirectories
    git add .

    # Commit the staged changes with a commit message
    git commit -m "First Commit from Git CLI"
Output:

And done! You have successfully connected Git Bash installed on your local machine with GitHub's servers. Now you can use Git commands to push files, create new directories, and create, switch or delete branches.
Important Git Commands 💡
Here is a comprehensive list of git commands a new git user must know
| Command | Description |
git init | Initialize a new local Git repository. |
git clone <remote repository URL> | Clone a remote repository to the local machine. |
git status | Check the status of the working directory and staging area. |
git add <file name> | Add a file to the staging area for the next commit. |
git commit -m "<commit message>" | Commit changes to the staging area. |
git push | Push local changes to the remote repository. |
git pull | Fetch and merge the latest changes from the remote repository. |
| Branching | |
git checkout <branch name> | Switch to the specified branch. |
git branch | List all branches, or create a new branch. |
git merge <branch name> | Merge the specified branch into the current branch. |
git branch -d <branch name> | Delete a branch. |
| Rolling back | |
git reset --hard <commit hash> | Hard reset to a specific commit, discarding all uncommitted changes. |
git reset --soft <commit hash> | Soft reset to a specific commit, keeping uncommitted changes. |
git checkout <commit hash> | Check out a specific commit, making it the current working tree. |
| Rebasing | |
git rebase <branch name> | Rebase the current branch onto another branch, replaying the commits on top of the other branch. |
git rebase --interactive <branch name> | Interactively rebase the current branch onto another branch, allowing you to edit the commit messages or remove commits. |
Solving Merge Conflicts 🤜💥🤛
Merge conflict demystified
Resolving merge conflicts is like fixing a puzzle where two people make changes to the same part of a project at the same time. When Git detects this overlap, it highlights the issue and asks for your help to figure out the best combination. To solve it, you review the changes, decide which parts to keep, and blend them. Common tools or Git commands can guide you through this process, helping you make choices that keep the code working well.
Demonstration of Merge Conflict
I have intentionally created a merge conflict. You can follow the below commands to create a merge conflict on your own
# Initialize a new Git repository
git init

# Create a new branch named 'branchA' and switch to it
git checkout -b branchA

# Make changes in 'branchA' by adding content to 'myfile.txt'
echo "This is branchA content" >> myfile.txt
git add myfile.txt
git commit -m "Commit in branchA"

# Switch back to the main branch
git checkout main

# Make conflicting changes in the main branch to the same file ('myfile.txt')
echo "This is main branch content" >> myfile.txt
git add myfile.txt
git commit -m "Commit in main"

# Attempt to merge 'branchA' into 'main', causing a merge conflict
git merge branchA
Output

You can see the output on the terminal describes the conflicts related to a file called "myfile.txt" due to which the merging of two branches failed.
Solving Merge Conflicts
Open the project directory and find the conflicting files
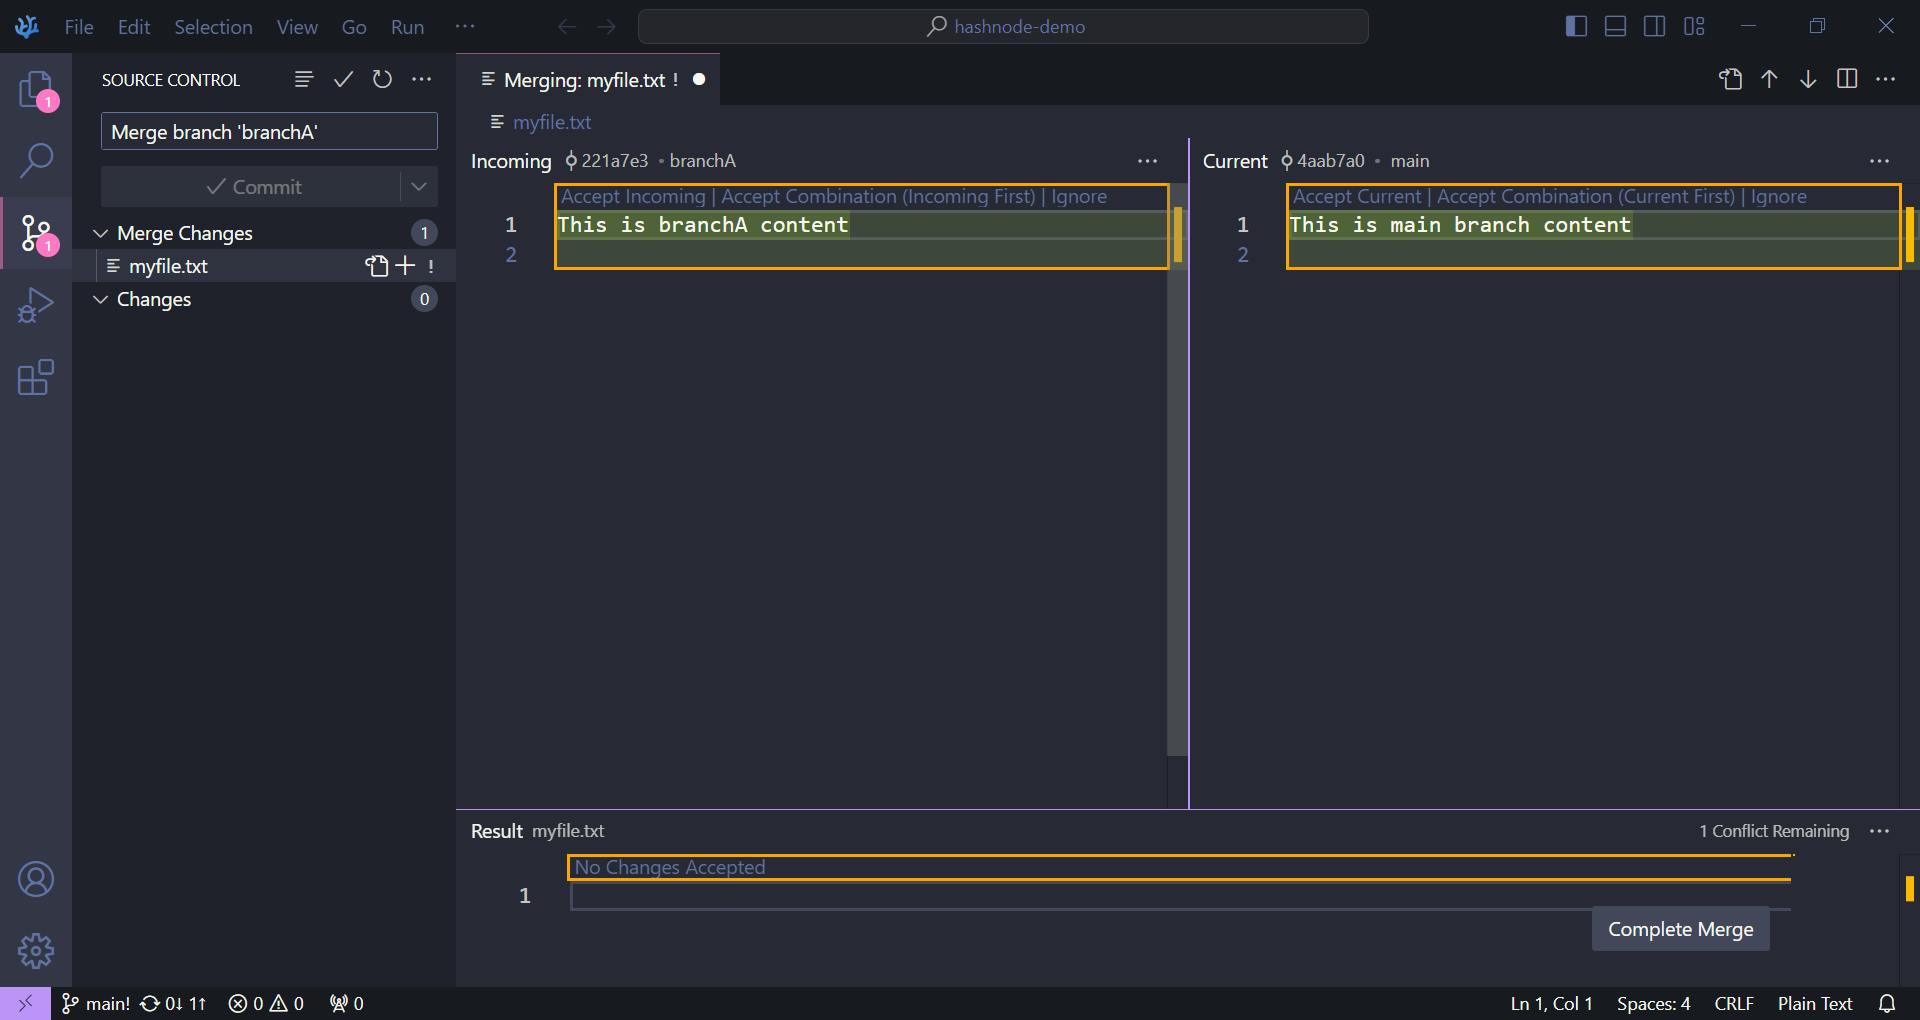
git statusOpen the conflicted file in a text editor like VS code would work the same way, I have opened it in Vscodium and highlighted the changes in chronological order.

Click on the
resolve in the merge editorbutton, it will open two separate columns having different versions added for the same section
Select the options available in each column version, and choose the right part of the code that you want to add or ignore, then commit your changes.


And you are done for the day. Congratulations on learning the Basics of Git now you are ready to get your hands dirty on Git and GitHub. You also use GitHub to host your website but that is something I want my readers to explore and remember Git is just another skill you have to practice more to understand its use cases and commands.
That's all for this blog meet you in the next one.
